
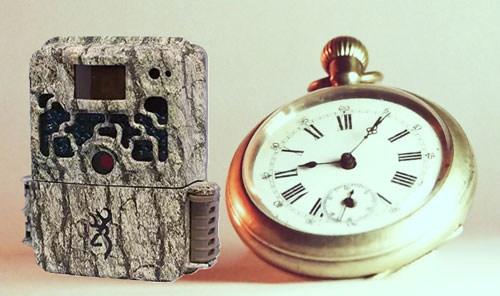
When you have a trail camera, or get one for the first time, the most exciting part is to see what images and/or videos you have captured. So once you have it set up and in the field, the question we all ask ourselves is, “How often should I check my trail camera(s)?”
Most of the time we like to hunt in out-of-the-way places that are far from human activity. Therefore, the very act of checking your trail camera causes a disturbance in these out-of-the-way hunting locations. Checking your trail camera allows deer and other game the opportunity to see, hear, and smell the person checking the camera. This disruption in the environment can spook any deer in the area and cause them to deviate from their normal patterns and behaviors for a period of time.
Unfortunately, the answer to the question of how often to check trail cameras for most situations would be to check your trail camera as little, or as infrequently as possible.
Before heading out to check your trail cameras you need to create a low impact trail camera checking strategy, which includes:
- When to Check Your Cameras
- Learn How to Check Your Trail Cameras
- Maximizing the Amount of Time Betweens Trips to Check Your Trail Cameras
So let’s talk about the different components of an effective strategy.
Table of Contents
Creating an Effective Low Impact Strategy for Checking Trail Cameras
An effective strategy for checking your trail cameras will have three components much like a three-legged stool. Without all three legs, a stool won’t stand up. Conversely, with all three legs, a stool will be effective and capable of supporting a lot of weight.
In a similar way, paying attention to all three components of an effective low impact strategy to check your trail cameras will ensure that you get the information you need in a timely fashion so you can make those critical decisions that will make your hunting season a success without disturbing the game animals in your area.
1. Figure Out the Best Time and Day to Check Your Cameras
The most important component of a low-impact plan for checking your trail cameras is to pick the best days and times to check each camera so you won’t disturb the very animals that you are trying to monitor. Not every situation is the same so there isn’t just one answer for when you should check your cameras.
You not only want to determine the best time of day to pull memory cards, but you also want to do it as infrequently as possible.
You need to consider each of the following factors to determine the best time to check your cameras and remember that there might be different times that are optimal for each camera.
Consider Where Your Trail Camera is Located
Obviously, every camera is located in a different spot and some locations will be much much more limiting as you look for that ideal time of day to check your camera.
Some cameras get posted in places where there is a lot of human activity and the animals get used to not only seeing and hearing people but also get used to human scent. So they are less likely to be spooked if they see or smell you. These more “public” locations can be pretty easy and flexible to check. Maybe you walk or drive by these locations on a regular basis. If so, it is pretty easy to stop and these cameras whenever you are passing by without causing a big disturbance.
However, some locations are deep in the woods where people never go unless it is hunting season. In those more remote locations picking the wrong time to check your camera can be disastrous. The animals there are not used to humans being there and choosing the wrong time to check those cameras could cause those animals to drastically change their behavior pattern and potentially ruin your hunting season. So you need to consider the other factors on our list before deciding to head out to your hunting property.
Think About the Type of Game Animal You Are Monitoring
On a related note, you need to consider the type of animal you are monitoring. Do you hunt deer like me or are you using your cameras to hunt something else?
Each species have their own typical behavior pattern and it is vital that you understand these patterns for the animals you are monitoring. With whitetails, they tend to be more active in the mornings and then again in the evenings. So IN MOST SITUATIONS I probably want to check my cameras around midday.
What Time of Year Is It?
If you typically aren’t checking your cameras at midday the time of the year can be an important thing to consider. For example, if you are checking your trail cameras at 4:30 pm in July doing that in November could be disastrous since the sun is about to set and it is close to getting dark.
Don’t Forget About the Rut
If you are hunting deer and are trying to get that big buck you have seen earlier in the year you don’t want to alert him to your presence and scare him off. However, if the rut is in full swing the bucks are singularly focused on finding does. So you might be able to go out more frequently or at different times than you normally would without scaring him off. That said, you still don’t want to be careless, because if you bump the does out of the area the bucks will follow them.
Where Are the Bedding Areas?
If you are like me and hunt deer you already know that they are creatures of habit, like humans, and have a preferred routine. Much of a deer’s routine revolves around safety and comfort. They do things in a certain way because it meets their needs or makes them feel safe or often both. However, if you scare or spook a deer they may change their normal routine. If this happens right before or during hunting season you run the risk that the animal might never return to its normal routine and if it does it may not be until after your hunt is over.
Deer spend the majority of their day bedded down. So going out to a trail camera at midday in locations that are by a bedding area or in places where you need to walk through a bedding area to access the camera can be a bad idea. You could end up ruining your whole season. This means that you want to find out where the preferred bedding areas are in your area before deciding on a plan for when to check your trail cameras.
If you have a camera that is placed in or near a bedding area I would suggest that you either move the camera or check it very infrequently (maybe every month or two). Another option would be to put a cellular trail camera in that area so you only have to physically check on the camera a couple of times a year.
Consolidate Your Trips
The last thing you want to do risk is creating two disturbances in your hunting area within a few days of each other. So if you have multiple cameras you should think about which ones you want to pull memory cards from within the next week or two and make a plan to consolidate those trips and stop at each of those cameras when you head out.
Another thing you can do to eliminate extra trips to your hunting land is to check cameras when you are going to be passing by them for another purpose.
Sometimes during hunting season, the behavior patterns of game animals like deer can change fast, especially if the rut is in full swing. So if end up walking by a camera to get to my hunting stand or blind during a hunt I will use the opportunity to pull the memory card as I walk by as long as I don’t bump the deer out of the area. After all, the information I get from the card might help me decide where I should hunt for the next few days.
Only Check Your Trail Camera(s) When It Is Essential
Whether you just got your first trail camera or if you have been using multiple trail cameras for years it is always exciting to check on your cameras and see what they have captured. So it is normal to want to check them all the time. However, we need to remember that the reason we like trail cameras so much is that they help us get the information we need to make decisions that will make our hunting season a success and if we check them too frequently we could end up sabotaging our hunting season instead. That is why we should get in the habit of only checking our trail camera(s) when it is essential.
So what is essential?
I define the need to check my trail camera as essential if any of the following apply:
- You suspect the batteries need to be replaced.
- The memory card could be close to running out of storage space.
- A bad storm came through the area and you want to check the camera for damage.
- Your cellular trail camera has stopped sending you images.
- If what I find, or don’t find, on the SD card could result in me taking some sort of action. For me, it is essential to see what is on the SD card if what you discover would make you move your camera, look for a new location to put up a stand or blind, or make you consider an entirely new hunting property altogether. However, if you are simply taking an inventory of what deer are on the property this year or checking out a potential location for next year, then it is not necessary to check the SD card frequently and it can probably wait until the end of the season.
2. Learn What to Do When Checking Your Trail Cameras
Once you have decided on when you are going to check your cameras you want to get prepared before heading out to your hunting property so you can be efficient and not waste time, so you can avoid creating too much of a disturbance when you are checking your cameras.
There are actually several easy things that you can do to be prepared and organized before heading out.
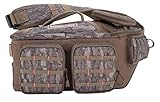
Bring a Backpack
One of the best things you can do when you are checking your trail cameras is to carry a backpack. Not only can it hold everything you will need, but it can help to keep things organized so you can find what you need quickly.
The key to any good backpack is for it to have several different storage compartments because you are going to need to bring several items with you and if you need to check several trail cameras things in your pack can get out of control fairly quickly if it doesn’t have enough compartments.
You might already have some good backpacks laying around, but if you run a lot of trail cameras you might be interested to know that there are actually backpacks out there that were specifically designed for trail cameras.


Bring Extra Camera(s)
If you have several trail cameras, but don’t have all of them posted on your hunting property you should throw one or two of them in your backpack. This will allow you to quickly replace a broken camera in the event that something happened to it while it was out.
Having extra cameras with you can also come in handy if you find something interesting on your hunting land. That way you can quickly put up another camera without having to make a separate trip.
Have An Extra SD Card for Each Camera
We always recommend buying an extra SD card for each of your cameras and bring them with you as you go to check your trail cameras. SD cards are fairly affordable, and they are usually very quick and easy to take in and out of your trail camera.
By swapping out the SD card and not having to transfer all the picture and video files to a computer or other device will get you out of the woods faster and allow you to look at the pictures and videos at your leisure when you are home. If you need to buy an extra SD card for your camera and aren’t sure what to buy you can read our article that helps explain how to find the best SD card for your trail camera.
However, before swapping out the cards and leaving the camera you probably should preview some of the pictures and videos on the LCD screen of the trail camera to verify that everything is working correctly. If your camera doesn’t have a color LCD screen you may want to think about investing in an SD card reader or viewer so you can verify that the camera is capturing the photos and videos properly. If you need to buy a card reader or viewer and aren’t sure what to get you can check out our article where we review the different options and talk about what you should look for.
Make Sure That the Extra SD Cards Are Formatted
In addition to having an extra SD card for each of your trail cameras, you want to make sure that the SD cards are formatted properly so that they can be used in your trail cameras. You want to make sure you have a card reader or viewer to plug into your computer.
Many cameras are able to format cards that are placed into them, but not all cameras can. If your camera(s) can’t format cards you want to format the SD cards at home on your computer before heading out to your cameras.
The other thing you want to remember is to use each card with only one camera. The reason for this is because not all cameras format memory cards in the same way, which can sometimes mean a card that works in one camera is unusable in another. To avoid this problem I like to do is organize my memory cards and label each of them so it is very clear which trail camera they should be used with.
Remember to Bring Extra Batteries With You
You eventually are going to need to change the batteries anyway, so buy some high-quality batteries in advance and bring them with you each time you check your trail cameras. That way if your batteries need to be replaced you won’t need to make that extra trip back into the woods.
Minimize Your Scent
Deer have a sense of smell that is many more times sensitive than humans. So when you go in the woods to check your trail camera try to remember to wear rubber boots and bring some scent-eliminating spray with you to do your best to eliminate any human scent you might leave in the woods.
Plan Your Path
Once you get to your hunting land make sure that you are as efficient as possible. Have a plan in place to check your cameras in such a way where you don’t pass through the same area multiple times if you can avoid it. This will help you minimize the amount of time you spend in the woods and create less of a disturbance.
3. Maximizing the Amount of Time Betweens Trips to Check Your Trail Cameras
Earlier when we talked about only checking your trail cameras when it was essential to do so, many of the essential reasons to check your trail camera revolved around the memory card running out of storage space or the need to replace the trail cam’s batteries. Luckily there are things we can do to make those issues easier to manage and less of a problem.
Use the Largest SD Cards Your Camera Can Accommodate
")
The first thing you want to do is make sure that your camera doesn’t run out of storage space for our pictures and video. To do this you will want to buy a memory card with the largest capacity your trail camera can handle. If you are unsure of what type of card would be best for you and your trail camera you can read our article discussing how to choose the best SD card for your trail camera here. Most trail cameras can accommodate memory cards up to 32GB in capacity like this class 10 SanDisk Extreme Pro 32GB SDHC card. However, if you have a trail camera that can accept something larger you should go with that.
Use Lithium Batteries

The second thing you will want to do is be sure that your batteries last as long as possible so your trail camera doesn’t run out of power between your visits. To do this you will want to be sure that you are buying high-quality batteries. Energizer Ultimate Lithium batteries are usually best. Not only do lithium batteries provide the best performance and longest life, but they are the best performing batteries for extreme temperatures, which can be a big deal on cold days when other batteries struggle to perform.

Use an External Power Source
Most modern trail cameras have an input for an external power source. This will give you to option to use external battery packs or solar panels to dramatically extend the amount of time your trail camera will have power between visits.
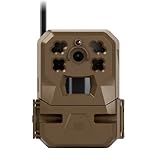
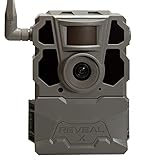
Consider Using Cellular Trail Cameras
If you are looking to buy a new trail cam you can also consider buying a cellular trail camera. While more expensive cellular trail cameras offer the ability to send you images over cellular networks. These cellular trail cameras require data plans with monthly or yearly fees to send images over cellular networks. So before buying a cellular trail camera be sure that you are okay with the fees and verify that you can get a cellular signal where you intend to place the trail camera. Cellular trail cameras will use more power in order to send the pictures to you. So if you get a cellular trail camera you will want to think about the solar panels and external batteries mentioned above, otherwise, you will still need to make frequent trips to the camera to replace batteries. This is especially true if your camera is in a place where it will be capturing a lot of images. If you want to learn more about cellular trail cameras you can read our article Cellular Game and Trail Camera Reviews and Buying Guide here.


Final Thoughts
The key to making your life easier when you go to check your trail cameras is to be as efficient as possible. By having a plan of action before you set out, and by picking trail cam placement locations thoughtfully and carefully to avoid re-traversing areas multiple times you can minimize the amount of time you spend in the woods checking on your game cameras. By doing those things and extending the amount of time between visits to your trail camera, your hunting area will remain undisturbed and you will have the information you need for a successful hunting season.
Last update on 2024-04-23 at 05:18 / Affiliate links / Images from Amazon Product Advertising API
