
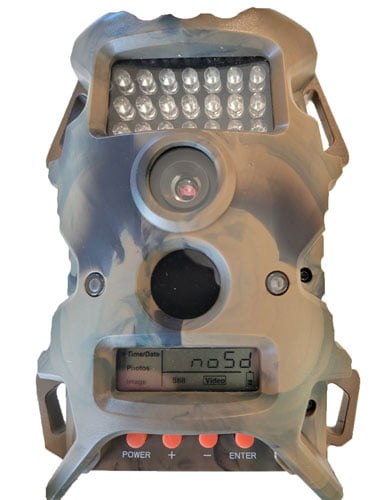
Whether you are using them to scout game animals or monitor property, trail cameras are extremely helpful tools, but they are useless without a memory card to save the pictures and videos on. So it is extremely frustrating when your camera tells you “No SD Card” or another similar message when you can clearly see that there is an SD or microSD card inserted in the camera. This feeling of frustration is only made worse if you happen to be in the middle of the woods when this happens.
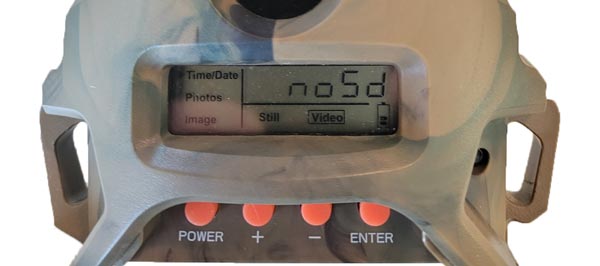
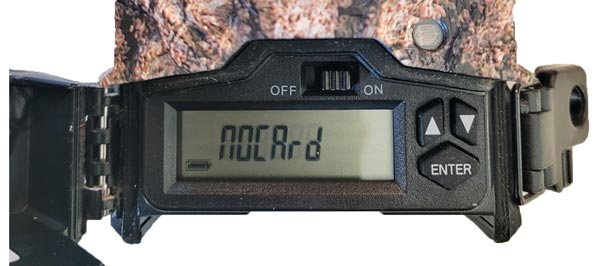
Here are a few examples of the types of messages you could see on your trail camera.
The key to resolving this problem is to understand the cause of the message. In this article, we will explain why your camera says “No SD Card”, and what you can do to fix it.
To swiftly navigate through this inconvenience and get your trail camera operational again, consider the following summarized solutions:
Most often this problem can be fixed with one of the following solutions:
- Check if the correct SD card is being used and is properly formatted for your specific trail camera.
- Inspect the SD card for defects or damage, particularly the contact pins.
- Clean the card slot on the camera to remove any dust or debris.
- Verify the SD card is inserted correctly, with the contact pins oriented as per your camera’s requirements.
- Check if the SD card is locked and unlock it if necessary.
- Perform a fresh restart of the camera by removing batteries for a minute.
- Consider the possibility of a defective card slot if all else fails.
Keep reading for detailed solutions to each of these points and get your trail camera back to capturing valuable footage in no time.
Table of Contents
Why Does My Trail Camera Say No SD Card Despite Having a Memory Card Inserted into It?
There are actually several different reasons why your camera might say this. Thankfully, figuring out the reason why you are getting this message is pretty easy and straightforward. So let’s go through 6 reasons why you might be getting this message and explain the solution for each of them.
1. The Wrong Card Was Put into the Camera
The first and perhaps most common reason for your trail camera not recognizing that a memory card was placed into it is that the wrong memory card was put into the camera. This issue can be broken down into two categories:
The Memory Card Was Formatted for a Different Camera
When people talk about “formatting a memory card for a camera” they are referring to having the card set up in a way that the camera can use.
Trail cameras and other devices that use SD and microSD cards to store pictures, videos, or other data. These devices will need the memory cards formatted to their specifications, which means having the data on the card arranged in a way the camera can read, to work properly with them.
The thing is that these different devices might have different formatting requirements, meaning that memory cards that were formatted to work with one device may not be compatible with other devices unless they are reformatted to that other device’s specifications. This can be true for trail cameras as well. While in the past I have had trail cameras that worked with SD cards that have been formatted for other trail cameras this isn’t always the case.
Formatting an SD card for your trail camera is like giving it a map; without the map, the camera doesn’t know where to store the photos.
Solution:
If you run multiple trail cameras, as I do, the easy way to avoid this problem is to label your SD cards so you know exactly which trail camera each memory card was formatted for like we did on the following SD card.

However, if you haven’t labeled your cards or aren’t sure if the card that you’re using has been formatted for the trail camera it is in simply replace the card with another card that you know has been formatted for use with the trail camera that is giving you the “No SD Card” message.
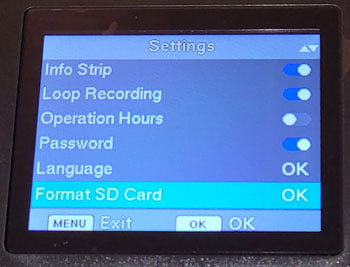
If you don’t have a second card that was formatted for the camera you can simply try reformatting the card for the camera that you are trying to use it with. Most modern trail cameras have a menu option in the settings that will allow you to format cards that have been inserted into the camera.
If your camera can’t format the card, you can do it using a computer. Here’s how:
- Insert the card into your computer.
- Open ‘My Computer’ and right-click on the SD card.
- Select ‘Format’ and then ‘Start.’
It’s like erasing a chalkboard so you can start fresh.
A Card with the Wrong Capacity Card Is Being Used
A lot of us think that bigger is better when it comes to a lot of things. However, that isn’t necessarily true when it comes to memory cards. Devices that use SD or microSD memory cards to store data are designed to work with certain types of memory cards. In addition to using thing cards with the correct speed and class specifications, you also want to make sure that you don’t use a memory card that has a capacity, which refers to how much data it can hold, that is larger than the trail camera that you are using it with is designed for.
If you use a card that has a capacity that is larger than what the trail camera is designed for the camera won’t be able to recognize the card.
Solution:
Trail cameras will work with memory cards that have a capacity up to the maximum capacity the camera was designed to work with. In other words, if you are using a 64 GB memory card in a trail camera that was designed for 32 GB memory cards, your trail camera won’t recognize that 64GB card when it is inserted into the camera.
Most modern trail cameras are able to use memory cards that are up to 32GB in capacity with a few models being able to handle cards up to 256GB or 512GB. So if your camera is giving you the “No SD Card” message, or something similar, and you are using a card that is larger than 32GB, you should try looking at your owner’s manual to see how big of a card your camera can handle. If you don’t have the owner’s manual and can’t find that information on the manufacturer’s website I would suggest trying a different card in the camera. More specifically, I would try using a card whose storage capacity is 32GB or less. As we said before, when it comes to memory cards, bigger isn’t always better.
2. The Card Is Defective
If you have done everything correctly and the trail camera will not recognize the memory card that you inserted into it, the card may be defective. This is not a very common problem, but it can happen, so it is important to be aware of it. If you are buying quality cards, this is less likely to be an issue, but it is still possible.
Memory cards are delicate pieces of technology and can be easily damaged. Even if they are made by reputable manufacturers, SD, and microSD cards can occasionally be defective right out of the packaging. So you can’t just assume that the problem is with your camera.
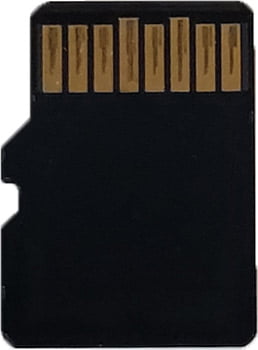
Sometimes for SD and microSD cards that have been used for a while, the contact pins can become worn over time, causing the camera to not be able to connect to or be seen by the camera. Below is an example of a microSD card with contact pins that are starting to show wear and tear.
Solution:
If you find yourself in this situation the easiest solution, and the one I suggest you try, is to try using a different card in your camera to see if that will solve your problem, regardless of whether you are using a new card or one that you have had for a while. This will help you determine if there is a problem with your card or something else.
If you don’t have a second card that you can put in your camera I suggest that you go out and buy one. As we discussed in our article about how often you should check your trail cameras, we always recommend that you have two memory cards for each of your cameras anyway. Having two memo cards for your cameras means that you will spend less time in the wood checking cameras creating less of a disturbance for deer or other wildlife that is in the area.
If after looking at your memory card you notice that the contact pins are looking pretty worn or dirty, but don’t have a second memory card handy or the ability to get a second card quickly you can try cleaning the pins, some people have had success using a pencil eraser to clean the pins and get the camera to recognize the memory card. However, if using the pencil eraser trick or some other hack allows your camera to connect to your memory card my advice would be to buy a new card, or cards, for your camera. The last thing you want with a trail camera is to find out that it didn’t save any pictures or videos because the memory card failed or couldn’t maintain a connection with the camera. So if the contact pins appear to be worn out I would just go and buy a new SD or microSD card since they are so much more affordable these days.
If you want a little help picking out a new memory card(s) for your trail camera you can read our article on how to choose the best SD cards for trail cameras.
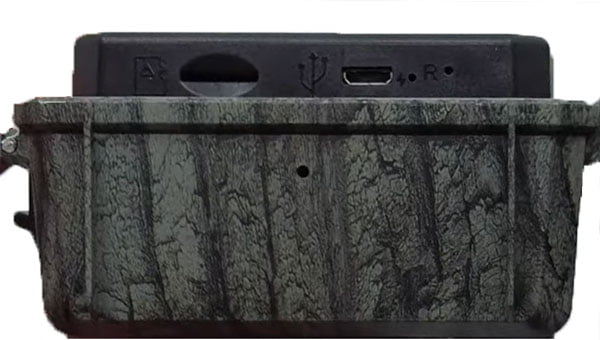
3. There Is Dust or Debris in the Card Slot on the Camera
The card slot on almost every trail camera is on the bottom of the camera, which makes it harder for debris or moisture to enter. However, if you don’t keep your SD cards in a case or some other container to keep them clean when they are not in the camera they could introduce dirt and debris into the card slot. Eventually, this could prevent the camera from making a good connection to the memory card making it impossible for the camera to detect any card that is inserted into the card slot.
Solution:
If you suspect that accumulated dust or debris in your camera’s card slot is preventing your camera from “seeing” the memory card you can try to clean out the debris from the slot. Using a can of compressed air to clean out the slot is the way to go, but if you are in the middle of the woods and don’t have access to canned air you can try blowing it out with your mouth, but you need to be careful that you don’t blow any spittle into the camera.

- Falcon Dust-Off Aerosol Compressed Gas (152a) Disposable Cleaning Duster, 1-count, 3. 5 oz can The Original Duster 100% Ozone Safe A Bitterant is added to the Compressed Gas to Discourage Inhalant Abuse The Versatile Cleaning Tool
- Compact
- Indispensable for places where space is tight
- Same efficient blasting power as larger models
- 100% Ozone safe Bitterant added to help discourage inhalant abuse
4. The Card Is Inserted Incorrectly
We’ve all been there – trying to hurry up and get out of the woods and end up getting the memory card inserted correctly into the trail camera on your first try. Sometimes people are afraid of applying too much pressure on memory cards and risk damaging them. Still, other times people insert the card into the slot with the contact pins facing the wrong direction.
Not having the SD or microSD card inserted correctly can be an issue, especially if you’re a new or inexperienced trail camera or SD/microSD card user.
Solution:
I get it. SD and microSD cards are fragile. So it’s understandable that you don’t want to apply too much pressure and risk damaging them. But, taking a moment to ensure that the card is inserted correctly could save you time and headaches in the future.
Unlike the SD card port on many computers where you just slide the card in until it is fully inserted (not being completely sure exactly where the point of being fully inserted is), it is much easier to insert and remove SD and microSD cards with a trail camera. With trail cameras, you simply insert the card until you hear and feel it click, similar to when you push on the top of a clickable ballpoint pen. I think that my first trail camera many years ago didn’t have this clicking feature, but thankfully all (or virtually all) modern trail cameras have switched over to this clickable system, which is not only more secure but leaves no doubt as to whether or not you have inserted the card far enough.
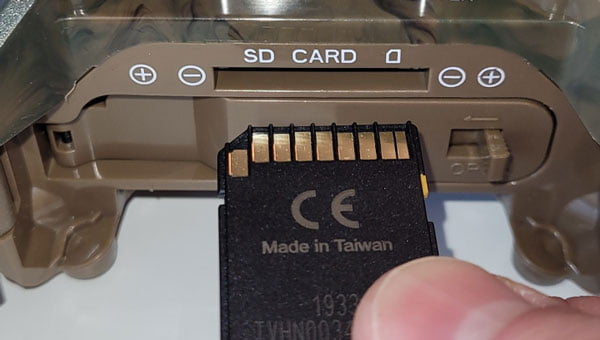
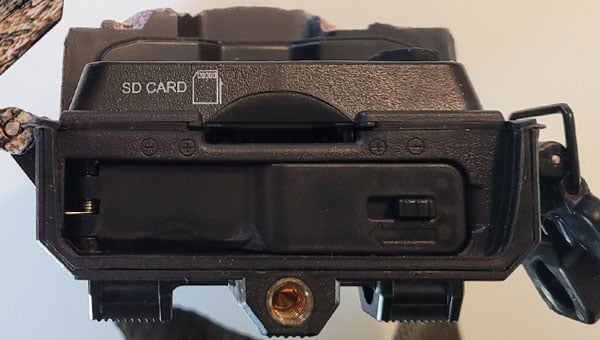
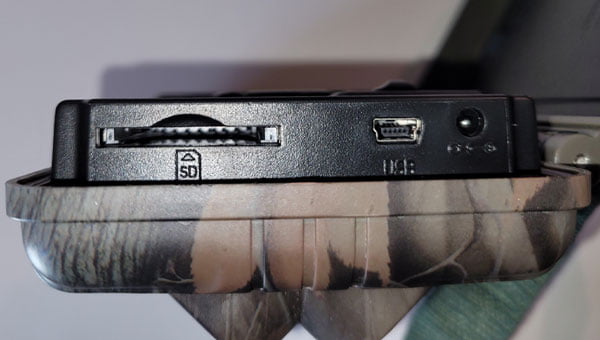
As far as which direction the contact pins should face there is no universal answer. While the end of the card with the contact pins is always the end that gets inserted into the trail camera, some cameras will have the card positioned so those pins are facing toward you and other trail cameras will have those pins facing away from you when you are inserting the card into the camera.
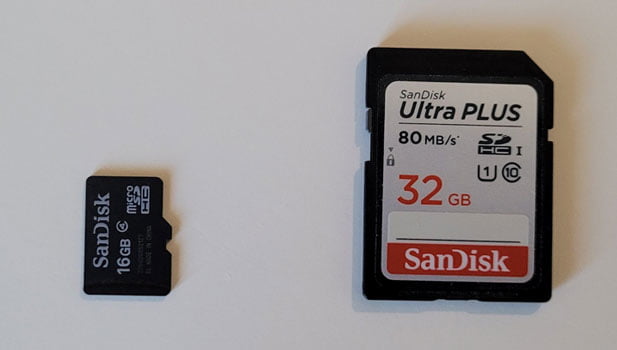
The good news is there will be directions telling you which way to insert your memory card in the manual that came with your trail camera as well as on the camera itself. If you look at microSD cards as well as the larger traditional sized SD cards are not perfectly shaped rectangles. The unique asymmetrical shapes of both the SD and microSD cards are the key to knowing how to orient the cards when inserting them into a camera.
Look for an image by the card slot on your camera. The image will show you how should orient the card when you insert it into the camera. Below are some pictures showing what you could expect to find on your trail camera.
5. Memory Card Is Locked
On every SD card, you will see a little switch that is next to the word lock or a padlock symbol.
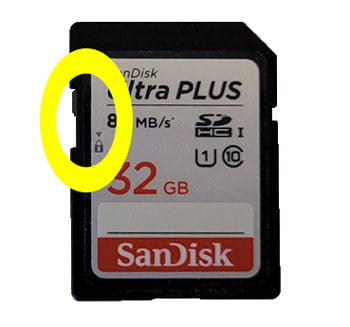 If this switch is moved down to the locked position it protects the content that is already on the card from being overwritten.
You won’t see this locking switch on microSD cards, but you will find it on microSD card adapters, which allow microSD cards to fit into and be used in the larger SD card slots.
In experiments that I have done with my own trail cameras, after inserting a locked memory card into a trail camera some models will see that the card you inserted is locked and tell you that you still need to insert a memory card into the camera. Meanwhile, other cameras will not see that the memory card is locked and won’t give you any message at all even though they won’t be able to use it to save pictures or videos.
Solution:
So if you are getting one of these messages telling you to insert a card you may want to quickly check to see if the card that is already in the camera is locked.
6. The Camera Needs a Fresh Start
Sometimes trail cameras and other electronic devices with computer components stop working correctly and simply need to be restarted to resume error-free operation.
Solution:
While this may not be the case of your problem, this could certainly be worth trying especially if you are in the middle of the woods and can’t get the camera to recognize the memory card you placed in it. So simply shut the camera off and remove the batteries. Then wait a minute or two before reinserting the batteries and turning the camera on again to see if it will recognize the card.
7. The Card Slot on the Camera Is Defective
This is another rare one, and as a matter of fact, it hasn’t happened to me, at least not at the time I am writing this, but as with all devices sometimes things wear out, break, or come defective from the manufacturer. So if you went down this entire list and still are still getting the “No SD Card” message on your trail camera, it could be your device that your trail camera needs to be repaired or replaced.
Solution:
So save your receipts and user manuals so you can reach out to the manufacturer of your trail camera and get it replaced or repaired if it is under warranty.
If the camera isn’t under warranty then things become a little trickier. If it was an expensive model I would certainly think about looking into the option of having the camera repaired and see how much it would cost. However, even if it was a very inexpensive trail camera I would still probably reach out to the manufacturer as sometimes they may have another suggestion for you on how to fix it yourself or may offer you a discount on one of their new cameras.
Frequently Asked Questions (FAQ)
After reading through the tips on fixing the “No SD Card” error on your trail camera, you might still have a few questions. Here’s a collection of common questions and their answers to help you get your trail camera up and running quickly.
What Types of SD Cards Are Compatible With Most Trail Cameras?
Most trail cameras are compatible with standard SDHC (Secure Digital High Capacity) cards up to 32GB in capacity. For cameras that support higher capacities, SDXC (Secure Digital Extended Capacity) cards, which can go up to 2TB, might also be used. Always check your camera’s specifications to be sure.
You can read our article about choosing the best SD cards for trail cameras if you want to learn more.
How Often Should I Format My SD Card for Optimal Performance?
You always should format your SD card the first time you install it in the trail camera. This helps to ensure the card is clean and ready to store new images and videos, minimizing the risk of errors.
If you’re reusing the card in the same camera after downloading your photos and videos and haven’t experienced any issues, reformatting shouldn’t be necessary. However, if you’re switching the card between different cameras or suspect any corruption might have occurred during file retrieval, it’s a good practice to format the card again for optimal performance and to safeguard against errors. This helps maintain the health and reliability of your SD card, ensuring your trail camera operates smoothly.
Can I Use a microSD Card With an Adapter in My Trail Camera?
In theory, you should be able to use a microSD card with an SD adapter in your trail camera. However, I have seen instances where a trail camera won’t work properly with a microSD card with an adapter. Even if it does seem to work the photo or video quality might be negatively impacted. So my best advice would be to avoid using microSD cards in cameras that were designed to use the larger-sized traditional SD cards.
If you do decide to use a microSD card with an adapter you will still need to ensure the total storage capacity does not exceed your camera’s maximum limit, and remember to format the microSD card according to your camera’s requirements.
What Should I Do if My Trail Camera Still Doesn’t Recognize the SD Card After Following All the Steps?
If your trail camera still doesn’t recognize the SD card after trying all the troubleshooting steps, the issue might lie with the camera itself or the SD card may be irreparably damaged. Try the card with another device or try a new card with the camera. If the problem persists, consider contacting the manufacturer for further assistance or explore the possibility of having the camera serviced.
Do SD Card Brands Matter When Using Them in Trail Cameras?
While most SD cards should work with your trail camera, choosing a reputable brand can reduce the chances of encountering compatibility issues, water resistance issues, or failures. Brands like SanDisk, Lexar, and Kingston are known for their reliability and are recommended by many trail camera manufacturers.
One of my favorite brands is SanDisk. However, I know that buying some of the name-brand cards can feel a bit expensive if you are buying multiple cards especially if they are higher-capacity cards. That said, I have bought the Walmart brand memory cards in the past and had no issues using them in my trail cameras.
Final Thoughts
There are several different reasons why a trail camera would not recognize a memory card and give you a message like “No SD Card”, but the good news is that these problems are very easy to troubleshoot and in most cases, you don’t need to get too technical to fix them. So if you are getting this message just go through our list of most likely causes for this problem and your trail camera will be back out there collecting pictures and videos in no time.
I hope you found this article useful and that it helped you solve your problem.
Bestselling SD Cards
- Great choice for compact to mid-range point-and-shoot cameras
- Quick transfer speeds up to 150MB/s (Up to 150MB/s read speed engineered with proprietary technology to reach speeds beyond UHS-I 104MB/s, requires compatible devices capable of reaching such speeds. Based on internal testing; performance may be lower depending on host device, interface, usage conditions and other factors. 1MB=1,000,000 bytes.)
- Up to 256GB to store tons of pictures (1GB=1,000,000,000 bytes. Actual user storage less.)
- Exceptional video recording performance with UHS Speed Class 1 (U1) Class 10 rating for Full HD video (1080p) (UHS Speed Class 1 (U1) designates a performance option designed to support real time video recording with UHS enabled host devices. See consumers speed page on SanDisk site. Full HD (1920x1080) video support may vary based upon host device, file attributes, and other factors. Visit the SanDisk Video Knowledge Base for more information.)
- Compatible with SanDisk SD UHS-I card reader (sold separately)

- Save time with card offload speeds of up to 200MB/s powered by SanDisk QuickFlow Technology (Up to 200MB/s read speeds, engineered with proprietary technology to reach speeds beyond UHS-I 104MB/s, require compatible devices capable of reaching such speeds. Based on internal testing; performance may be lower depending upon host device, interface, usage conditions and other factors. 1MB=1,000,000 bytes. X = 150KB/sec. SanDisk QuickFlow Technology is only available for 64GB, 128GB, 256GB, 512GB and 1TB capacities. 1GB=1,000,000,000 bytes. 1TB=1,000,000,000,000 bytes. Actual user storage less.)
- Pair with the SanDisk Professional PRO-READER SD and microSD to achieve maximum speeds (sold separately)
- Shot speeds up to 90MB/s (Write speed up to 90MB/s. Based on internal testing; performance may be lower depending upon host device. 1MB=1,000,000 bytes. X = 150KB/sec.)
- Perfect for shooting 4K UHD video and sequential burst mode photography (Full HD (1920x1080) and 4K UHD (3840 x 2160) video support may vary based upon host device, file attributes and other factors. See HD page on SanDisk site.)
- UHS Speed Class 3 (U3) and Video Speed Class 30 (V30) (UHS Speed Class 3 designates a performance option designed to support 4K UHD video recording with enabled UHS host devices. UHS Video Speed Class 30 (V30), sustained video capture rate of 30MB/s, designates a performance option designed to support real-time video recording with UHS enabled host devices. See the SD Association’s official website.)

- Great choice for compact to mid-range point-and-shoot cameras
- Quick transfer speeds up to 140MB/s (Up to 140MB/s read speed engineered with proprietary technology to reach speeds beyond UHS-I 104MB/s, requires compatible devices capable of reaching such speeds. Based on internal testing; performance may be lower depending on host device, interface, usage conditions and other factors. 1MB=1,000,000 bytes.)
- Up to 64GB to store tons of pictures (1GB=1,000,000,000 bytes. Actual user storage less.)
- Exceptional video recording performance with UHS Speed Class 1 (U1) Class 10 rating for Full HD video (1080p) (UHS Speed Class 1 (U1) designates a performance option designed to support real time video recording with UHS enabled host devices. See consumers speed page on SanDisk site. Full HD (1920x1080) video support may vary based upon host device, file attributes, and other factors. Visit the SanDisk Video Knowledge Base for more information.)
- Compatible with SanDisk SD UHS-I card reader (sold separately)

- Compatible with Nintendo-Switch (NOT Nintendo-Switch 2)
- Expand your storage in a flash: ideal for Android smartphones and tablets, Chromebooks, and Windows laptops.
- Increase your TV show, movie, and Full HD video[4] recording collections dramatically with up to a massive 1.5TB[1].
- Transfer files fast with up to 150MB/s[2] read speeds and SanDisk MobileMate USB micro 3.0 microSD card reader[6].
- Load apps faster with A1-rated performance[3].

- Cards include security feature for protection of copyrighted data
- This is NOT a micro SD card
- SD cards are fully compatible with all SD-compliant devices
- Speed performance rating: Class 4 (based on SD 2.0 Specification)
- Writeable label for easy identification and organization
- Shot speeds up to 90MB/s, transfer speeds up to 100MB/s (Up to 100MB/s read speed. Write speed up to 90MB/s. Based on internal testing; performance may be lower depending upon host device. 1MB=1,000,000 bytes. X = 150KB/sec.)
- Perfect for shooting 4K UHD video and sequential burst mode photography (Full HD (1920x1080) and 4K UHD (3840 x 2160) video support may vary based upon host device, file attributes and other factors. See HD page on SanDisk site.)
- UHS Speed Class 3 (U3) and Video Speed Class 30 (V30) (UHS Speed Class 3 designates a performance option designed to support 4K UHD video recording with enabled UHS host devices. UHS Video Speed Class 30 (V30), sustained video capture rate of 30MB/s, designates a performance option designed to support real-time video recording with UHS enabled host devices. See the SD Association’s official website.)
- Built for and tested in harsh conditions: Temperature-proof, waterproof, shockproof, and X-ray-proof (Card only. See product packaging or official SanDisk website for more information regarding proof.)
- English (Publication Language)

- High-Speed Transfer Performance: Powered by UHS-I technology, our micro SD card deliver read speeds of up to 90MB/s and support A1 app performance standards for faster app loading, making them perfect for HD video recording, and rapid file transfers.
- Wide Compatibility: Compatible with a wide range of devices, including smartphones, tablets, laptops, drones, action cameras, gaming consoles like Nintendo Switch, and surveillance systems. Include an SD adapter for extended compatibility, ensuring seamless usage across various platforms.
- Reliable and Durable: Designed for demanding conditions, the TF card feature waterproof, shockproof, X-ray-proof, temperature-resistant, and magnetic-resistant properties. Whether for outdoor adventures, surveillance, or sports recording, they offer dependable data protection and durability.
- Versatile Storage Options: Available in capacities from 32GB to 512GB, to diverse storage needs, from HD photos and videos to game data and apps. (1GB = 1,000,000,000 bytes. Actual user storage less.)
- Works with Everything You Own: Phones, tablets, drones, dash cams—this card is built to handle them all. Plug-and-play with UHS-I compatibility, it's a one-card solution for work, travel, gaming, and more. The SD logo is a trademark of SD-3 C, LLC.

- Brand: Sandisk
- English (Publication Language)

- Bundle Includes: 2 x SanDisk 128GB Extreme PRO 200MB/s SDXC UHS-I Memory Card
- Sequential Burst Mode: The memory card is rated UHS Speed Class 3 (U3) and Video Speed Class 30 (V30) and lets you capture sequential burst mode shots without missing a beat
- Durability: The SanDisk Extreme PRO SD UHS-I card is temperature-proof, waterproof, shock-proof, and x-ray-proof
- SanDisk QuickFlow Technology: With the innovative SanDisk QuickFlow Technology, this card optimizes performance for timesaving media offloads with quick transfer speeds up to 200MB/s
- Data Recovery Software: The card includes an offer for RescuePRO Deluxe 2-year data recovery software that lets you restore images you accidentally deleted
Bestselling microSD Cards
- Compatible with Nintendo-Switch (NOT Nintendo-Switch 2)
- Expand your storage in a flash: ideal for Android smartphones and tablets, Chromebooks, and Windows laptops.
- Increase your TV show, movie, and Full HD video[4] recording collections dramatically with up to a massive 1.5TB[1].
- Transfer files fast with up to 150MB/s[2] read speeds and SanDisk MobileMate USB micro 3.0 microSD card reader[6].
- Load apps faster with A1-rated performance[3].

- High-Speed Transfer Performance: Powered by UHS-I technology, our micro SD card deliver read speeds of up to 90MB/s and support A1 app performance standards for faster app loading, making them perfect for HD video recording, and rapid file transfers.
- Wide Compatibility: Compatible with a wide range of devices, including smartphones, tablets, laptops, drones, action cameras, gaming consoles like Nintendo Switch, and surveillance systems. Include an SD adapter for extended compatibility, ensuring seamless usage across various platforms.
- Reliable and Durable: Designed for demanding conditions, the TF card feature waterproof, shockproof, X-ray-proof, temperature-resistant, and magnetic-resistant properties. Whether for outdoor adventures, surveillance, or sports recording, they offer dependable data protection and durability.
- Versatile Storage Options: Available in capacities from 32GB to 512GB, to diverse storage needs, from HD photos and videos to game data and apps. (1GB = 1,000,000,000 bytes. Actual user storage less.)
- Works with Everything You Own: Phones, tablets, drones, dash cams—this card is built to handle them all. Plug-and-play with UHS-I compatibility, it's a one-card solution for work, travel, gaming, and more. The SD logo is a trademark of SD-3 C, LLC.

- Class 10, U3, V30 speed class performance with read speeds up to 100MB/s for fast and smooth burst mode HD Photography and 4K Ultra HD Videography
- A1 App Performance enables apps to run directly from the microSD card, delivering faster app launch and performance. A1 provides minimally 1500 IOPS (Read) and 500 IOPS (Write)
- Record and transfer videos, photos, music, files and more from microSD enabled host devices such as Android smartphones and tablets, action and surveillance cameras, drones, computers and more
- Included SD adapter for compatibility with SD enabled host devices including DSLR cameras, video cameras, desktops, and laptops
- Reliable & Durable: Magnet Proof, Shock Proof, Temperature Proof, Waterproof

- [4K Ultra HD] Read/Write up to 95/40 MB/s. 4K Ultra HD video displaying/recording
- [Compatibility] Storage for Camera, Security Camera, Action Camera, Sports Camera, Laptop, Tablet, PC, Smartphones. IMPORTANT DEVICE COMPATIBILITY: This 128GB card is natively formatted to exFAT. If using with older security cameras, dash cams, or Android phones, you must format the card to FAT32 using your device settings prior to use.
- [Environment] Waterproof, shockproof, temperature-proof and X-Ray proof
- [Support] Gigastone 5-year limited warranty

- CAPTURE LARGER THAN LIFE. Unlock startling 5K[3] point-of-view and pristine high-res stills with video speed class ratings of U3 and V30[4].
- SPEED BARRIERS SHATTERED. Save precious moments with rapid read speeds up to 245MB/s[2] and write speeds up to 170MB/s[2] [256GB-1TB capacities[1]].
- MAXIMIZE WITH MASSIVE CAPACITY. Record longer and store more with up to 2TB[1] of storage.
- DURABILITY YOU CAN COUNT ON. SANDISK microSD cards are temperature proof, humidity proof, waterproof, shock proof, drop proof, magnet proof, X-ray proof and wear-out proof[7].
- EASY CONTENT MANAGEMENT. Easily back up, organize, and transfer your photos and videos with the SANDISK Memory Zone desktop or Android mobile app[10].

- [NOT compatible with Switch2] Please note that this product is not a microSD Express card and is not compatible with Switch2 for game storage or save data. If used in the Switch2, it may only support limited functions such as storing screenshots or videos, but will not allow game installation or save file access.
- High compatibility for different types of devices including smartphones, tablets, Drones, Android Tablets, Tablet PCs, Action Cameras, DSLR and 4K or Full HD camcorder.
- Compatible with Nintendo Switch *In order to use a microSDXC card on the Nintendo Switch console, a system update is required.* See Nintendo official site for more details
- 5-year limited manufacturer warranty
- MASSIVE STORAGE: With capacities from 128GB to 1TB, there's no need to pick favorites or stress about space. Whether you're capturing hi-res photos, 4K videos or storing your favorite games and digital media, you'll have more than enough room to meet your everyday needs
- TAKE YOUR BURST SHOT: Capture high-resolution photos and record 4K video in real time. With transfer speeds up to 170MB/s¹, it's easy to transfer and access your content quickly. U3 and V30 ratings² support stable high-resolution video recording, while A2 performance³ helps apps load quickly. For gaming, load your games with ease and spend less time waiting
- WORKS WITH THE DEVICES YOU RELY ON EVERYDAY: Made for creators, gamers, and everyday users. It works across the devices you use most, including cameras, laptops, handheld gaming consoles or Android smartphones.⁴ Capture everyday photos and videos or store your game library with easy access across your devices
- PROTECTED FOR PEACE OF MIND: Designed for all of life's adventures, with 6-proof durability that protects your data from water, extreme temperatures, x-rays, magnets, drops and daily usage. It includes a 3-year limited warranty for added peace of mind⁵⁻¹²
- MAINTAIN YOUR MEMORY CARD HEALTH WITH MAGICIAN SOFTWARE 9.0: For added control and peace of mind, manage your memory card confidently with a suite of helpful tools built for everyday use. It helps you verify product authenticity, protect your photos and videos, and monitor card health with ease¹³
Last update on 2026-07-17 at 17:38 / Affiliate links / Images from Amazon Product Advertising API
