

The good news is that these days trail cameras are pretty dependable and durable. So before you run out and buy a new camera there are a few things that you can do to troubleshoot and easily fix most problems.
Depending on the specific symptoms your trail camera is experiencing the main culprit(s) behind your problem can vary. So let’s break it down by the situation.
Table of Contents
Tips On What To Check If Your Trail Camera Is Not Taking Any Pictures
If your camera isn’t taking any pictures or recording any video regardless of the situation you might want to start out by focusing on the camera location, SD card, or power supply.
Camera Location
Sometimes the only reason a trail camera isn’t taking pictures is because of the location where it is mounted.
The first thing you should do is make sure that that location you pick out for your camera is close enough to a game trail. Know the range of your camera’s flash and motion sensor (they are usually similar) and place the camera closer than that range to the area you want to observe. The fact of the matter is that some manufacturers might exaggerate the range of their cameras and even if they aren’t exaggerating the effective range of a trail camera can become less as the batteries become older.
On a related note, remember to be mindful of your camera’s range if you mount your camera in an elevated position. Not only do you need to angle your camera downward to allow the motion sensor to be triggered by whatever passes through the area, but you need to remember that the distance from the camera to the area you are monitoring is increased because of the elevation and downward angle.
SD Card Issues/Problems
Your camera might be running perfectly, but if everything isn’t OK with the SD card your trail camera will have no way to save the videos and pictures it is capturing. Luckily, identifying and fixing any problems with your memory card is easy.
SD cards have dropped in price over the past several years. So if you end up needing to replace your SD card it is a very affordable solution and is much cheaper than buying a new trail camera.
So what issues do you need to look for with your SD card?
SD Card Needs To Be Formatted
Before digital cameras can use an SD card they need to be formatted. This is true for the cameras you might use for family photography just as it is true for trail cameras.
Formatting SD cards erases all the data from the card and will also erase any firmware or other data that may have been on the card if it had been used in another device previously. By formatting the SD card you can effectively reset your trail camera.
Even if you have never used the SD card in another device, sometimes memory cards just get goofed up and the only thing you can do to solve your problems is to reformat them.
Some cameras will allow you to format your SD card while it is in the trail camera, which is the easiest/best solution. If your camera doesn’t allow you to do this or if you don’t know how to do it, know that it can also be done on a computer and it is relatively simple. For example, on a Windows 10 PC, all you need to do is:
- Insert the card into your computer
- Open “File Explorer”
- Go to “This PC” and look under “Devices and Drives”
- Right click on where the SD card is located
- Select/Click “Format”
Remember to save any pictures, videos, or other files that might be on your SD card if you want to keep them, because they will be erased when you format the card.
Wrong SD Card
Not all things are created equal and that saying also applies to SD cards. Sometimes when your camera doesn’t capture any images or videos the problem is as simple as the wrong type of SD card is in your trail camera.
Just because the SD card fits into your trail camera doesn’t mean that your trail camera will be able to use it. When shopping for a memory card for your trail camera there is more to consider than the physical size. These days there are SD cards, SDHC cards, and SDXC cards. You want to be sure that you are using a type of card that is compatible with your trail camera. With most cameras, you will be safe with an SDHC card, but check your owner’s manual to confirm which type of card is compatible/supported. Click here if you want to learn more about the different types of SD cards.
SD Card is Full
Today’s trail cameras can take some very high-resolution pictures and videos. If you are in a location that has a lot of activity and have your camera set to take pictures at the highest resolution or capture videos at longer lengths your SD card can fill up quicker than you expect.
Some trail cameras have a feature that allows the camera to delete the oldest videos and pictures to make room for new videos and pictures to be saved. If you don’t have that feature on your camera or have that feature turned off your camera will stop saving new data to your SD card once it is full.
So the solution is to remove the pictures and videos from the card to create room for new images and videos.
Another solution would be to make sure that you are running SD cards in your trail camera that have the highest amount of storage the trail camera is able to accommodate. These days 32GB is the most storage that most trail cameras will allow, but check your product manual if you are not sure because this is not always the case.
SD Card Has Bad Connection
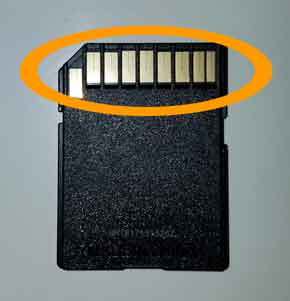
On the back of an SD card, you will see 9 contact pins. If you want your SD card to work each of these contact pins need to have a good connection with the contacts in your trail camera, computer, or whichever device you insert it into. If your SD card doesn’t have a good connection the device it is in won’t be able to read or use the card and you might see errors such as the card is full.
Wear and tear happen naturally and over time and eventually, you might notice scratches on the pins-especially if the card has been used a lot. If you see this you might try to use a can of air to get rid of any debris that might be on the contact pins and see if that helps. You can also blow the dust cleaner inside of the SD card socket in case there is any dust or debris in there. If after all of this you still have a bad connection and the trail camera doesn’t recognize the card you probably want to go ahead and buy a new SD card. You can read our article on How to Choose the Best SD Card for Trail Cameras to get some advice on what to buy.
SD Card Is Locked
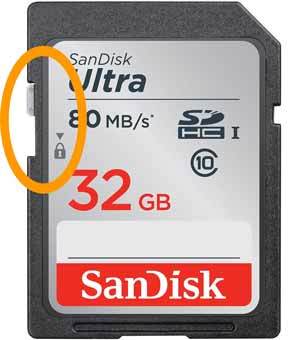
On the side of every SD card, you will see a switch that is used to lock the card. When the card is locked it prevents the data on the card from being overwritten and stops any new data (in this case photos and videos) from being saved to the card.
It can be easy to move the little locking switch on the side of the card accidentally. So check your card and make sure that the switch is in the unlocked position.
SD Card Is Corrupted
Sometimes products simply break or stop working. The same can be said for SC cards. Sometimes they become corrupted and are unusable.
If you have checked to make sure the card isn’t simply full, made sure the card isn’t locked, and removed debris from the connection pins and card socket on your device to no avail it might be time to buy a new SD card.
Thankfully the prices for SD cards with large amounts of storage have come down A LOT in the past several years. So this shouldn’t be too big of an expense. If you shop online you can often find some really good SD card deals on Amazon.
Battery Problems
If your trail camera doesn’t seem to be working and isn’t taking pictures don’t overlook the possibility that your difficulties have to do with your batteries.
It might sound obvious but look around on forums where people are looking for help with their trail cameras and you will find that a lot of the time they end up figuring out that their batteries were the cause of the problems.
So what should you look for with regard to your batteries?
Make Sure Batteries Are Installed Properly
If your trail camera doesn’t seem to have any power the first thing you should check is that the batteries are installed correctly.
Not only is installing the batteries incorrectly an easy mistake to make but is it easy to fix as well.
Test or Replace The Batteries

Once you have confirmed that the batteries are installed correctly you should next look at testing or replacing the batteries.
Trail cameras are designed to require a certain amount of voltage. As the voltage decreases performance starts to suffer and eventually the trail camera will no longer work or shut itself off. To ensure that your trail camera is getting enough voltage to work properly you can test the batteries.
To test the batteries you can buy an affordable battery tester like the one shown above.
If you happen to own a multimeter tool you can also use that tool to test your batteries. Here is a short video to show you how it is done.
If you don’t want to bother with buying something to test your batteries you can always put in a fresh set of high quality batteries to see if that helps your camera’s performance.
Make Sure You Are Using The Correct Batteries
Lastly, and maybe most importantly when it comes to batteries, make sure that you are using the correct type of batteries for your trail camera and the environment you are using it in.
These days most trail cameras use AA batteries. However, batteries are not all the same. So you shouldn’t just go to the store and buy any AA battery that you see. The assumption is that a AA battery will provide 1.5 volts, but the reality is that they often don’t.
There are lots of reasons why batteries don’t provide the voltage you expect and the voltage your trail camera needs. The first reason is that with the exception of rechargeable batteries, batteries will begin discharging from the moment they are packaged and depending on how quickly they discharge and how long they have been sitting on the shelf before you bought them they might provide well under the desired 1.5 volts before you even put them in the camera. So you want to make sure you buy high quality “fresh” batteries. The second reason is that even fresh batteries have differences in how long they are able to provide the proper voltage before they fall below the minimum acceptable levels. The third reason is that not all batteries perform well in temperature extremes. Finally, did you know that some trail camera manufacturers don’t want you to use rechargeable batteries in their trail cameras?
If you want to learn more about batteries and see which one is best for you and your situation you can check out our article about Best Batteries For Trail Cameras.
If you want to just go ahead and buy the best all-around batteries for your trail camera we recommend lithium batteries. Click here to buy the Energizer Ultimate Lithium Batteries on Amazon. Note these batteries have a very long shelf life and that if you buy the larger packs with more batteries you can save quite a bit of money.
Conclusion
Hopefully, this article gave you some actionable suggestions on what you can do when you are in the field and find out that your camera isn’t taking pictures.
Remember that while it is possible that your trail camera can be defective, most of the time it is just fine and there are some easy things that we can check or do to solve our problems without having to take the time to reach out to the manufacturer or the people who sold it to us.
Last update on 2026-05-30 at 19:11 / Affiliate links / Images from Amazon Product Advertising API
