
It is frustrating to check the SD card on your trail camera only to find out that the memory card is filled up with pictures and videos that have no subject in them. If you are asking, “Why does my trail camera take pictures of nothing?” your camera is the victim of false triggers.
Bushnell defines a trail camera as having a false trigger when the passive infrared sensor (PIR sensor) thinks that there is motion and heat in front of the camera lens and captures an image or video when in fact there is no subject in the image.
Having a trail camera taking pictures of nothing is bad enough, but to make matters worse, these false triggers drain your trail camera’s batteries. This can require you to be constantly purchasing new batteries for your camera regardless of how energy efficient it is.
Luckily, we have a list of the top 6 easy things you can do to help avoid false triggers with your trail camera.
Table of Contents
1) Avoid Placing Trail Camera Where There Will Be Direct Sunlight
Placing the trail camera in direct sunlight can result in false triggers as the sun moves across the sky during the day. Most of these false triggers will be associated with sunrise and sunset.
To get the most out of your trail camera, it is important to position it so that it has a clear view of the area you wish to monitor. That said, when positioning your trail camera, it is best to face it in a more northerly or southerly direction, with north being preferred in most instances. This will help to eliminate a lot of false triggers.
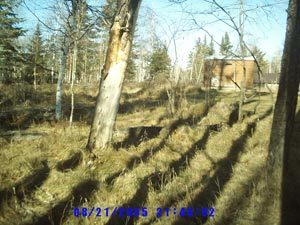
Below are a few images that are from a series of 26 false triggers I had on just one sunny late afternoon and evening in the fall as the sun was setting. These false triggers were caused by the changing shadows/light as the sun moved quickly toward the horizon. Luckily for me, my trail camera was facing pretty much straight north (actually a little NE). If not for that I could have had a lot more false triggers that evening. I didn’t have the correct time and date set on the camera as I was just doing some tests, but these 26 false triggers happened over a span of 2 hours and 51 minutes.


Because of the location I chose for my test, I didn’t have any false triggers in the mornings when the sun was rising, but the sunset was obviously a big issue on sunny days. I can only imagine how fast it would have drained my batteries or filled up my SD card if I had left my camera there for a month – especially if I was trying to capture video.
2) Avoid Having Your Trail Camera Face Water
If you’re looking to monitor an area near a body of water, it can be tempting to have your trail camera facing the water. Water backgrounds can make for some beautiful pictures or videos,
However, you should try to avoid placing your camera in a location where it faces the water, as the body of water can end up giving the camera a lot of false triggers. This is especially true if the camera is facing into the sun.
As it moves across the sky each day, the sun’s IR radiation can be reflected off the water, picked up by the motion sensor triggering the camera. In addition, the sun doesn’t heat the entire body of water evenly. So when the wind blows, creating ripples or waves on the water, the camera will sense the motion along with the temperature differences as a cue to start taking pictures or recording video, just as it would if a deer were walking in front of it.
When monitoring an area by a body of water the ideal situation would be to face the camera north and away from the water if at all possible (facing the camera south as your second choice). If there is no way to avoid having the camera face the water, try to keep it from facing directly into the sunrise or sunset to help minimize the number of false triggers.
Another tactic you can try if you absolutely have to have your trail camera face the water is to set the camera back from the water so that the camera’s detection area ends at about the point where the water begins. That should help to minimize the number of false triggers the PIR sensor(s) pick up from the water.
3) Mount your Camera to a Sturdy Tree
Sometimes people will mount their trail camera to a tree that is too small. If the tree sways too easily in the wind the camera will probably experience a ton of false triggers any time there is a windy day. As the tree your trail camera is mounted to sways in the wind, the passive infrared sensor (PIR sensor) will interpret this swaying as a movement in front of the sensor even though there is no subject there.
Simply making sure your trail camera is mounted to a sturdy tree will do wonders for helping to eliminate false triggers.
4) Place the Camera Away from Branches
Most of us will try to conceal the location of our trail camera. This is especially true if we are hunting on public land (where we might worry about people stealing the camera) or if we are using the camera for security purposes.
In either case, the efforts we take to conceal our trail cameras can sometimes very reason why we are getting false triggers. If you place your trail camera on the trunk of a tree, surrounded by branches, those branches could trigger the camera to take pictures or record video on a windy day.
So if you see any branches from the tree your trail camera is placed on in the pictures or videos it takes they are probably a big reason why it is getting false triggers especially when the wind is blowing. If this describes your situation there are two things you can do:
- Move the trail camera to another spot where it isn’t surrounded by branches and leaves.
- Trim back the branches and leaves until they are no longer visible in the images the camera captures. Keep in mind that many trail cameras have a detection range that is slightly larger than the camera lens’ field of view. As a result, you may want to trim things back a little bit beyond the area the camera lens can view.
5) Avoid Tall Grass
Similar to placing your trail camera in front of branches that can sway in the wind placing your camera in front of an area with a lot of tall grass could be troublesome. Depending on how much tall grass there is, how tall it is, and how close it is to the camera, the wind blowing through the grass can be enough to give you false triggers.
6) Adjust the PIR Setting On Your Camera
Depending on the age and model of your trail camera you might have the ability to adjust the sensitivity of the passive infrared sensor.
Ideally, you want to look at this option after you’ve tried the first four ideas on our list. Reducing the sensitivity of the PIR will increase the risk that your camera might miss something that you want to see. However, if you have already tried our other ideas and are still getting a lot of false triggers don’t hesitate to reduce the sensitivity of the sensor if your camera has that option.
Final Thoughts
If you find that your trail camera is taking pictures of nothing, it is likely due to false triggers. These false triggers can quickly drain your camera’s batteries and use up all the storage space on its memory card. By following the simple tips we covered in this article, you can greatly reduce the number of false triggers and help ensure that your trail camera is only taking pictures of the things you want it to.
